With the Armed Eye: How to Photograph Under the Microscope
At the end of July, the adjudicators for the microphotography contest Nikon Small World started selecting winners (and have not finished yet by the time this article was published). Meanwhile, Bird In Flight talked to three scientists from the US and Russia about becoming a microphotographer, coloring the samples for shooting and the practical application for photographs of the microworld.

Tom Deerinck
When I was young I was inspired by a number of people, including the work of legendary Swedish microphotographer Lennart Nilsson. His images of what was then thought to be unphotographable biology changed the way many people thought about life, including me. My father was also an amateur astronomer who ground his own lenses, and astronomy and microscopy are in many ways not that dissimilar. I have been doing photomicrography for almost four decades and after completing specialized training I was recruited to the National Center for Microscopy and Imaging Research (NCMIR) in San Diego by Dr. Mark Ellisman, one of true pioneers and visionaries in the field of microscopy, and this is where I’ve been ever since.
At the National Center I have access to some of the most sophisticated light, X-ray and electron microscopes in the world, some costing upward of $5 million dollars each. If you think about it, a microscope is really just a special kind of camera. One of my favorites is based on a design by one of our colleagues, Dr. Roger Tsien, who won the 2008 Nobel in Chemistry for his work on genetically engineered fluorescent proteins. It is a high-speed femtosecond-pulsed multiphoton laser microscope. It is a little complicated to explain in layman’s terms, but it uses a high-energy titanium-sapphire laser and special optics to excite fluorescent molecules that we introduce into cells and tissues.
Each microscope has it’s own special requirements for sample preparation and each can be very different. For instance, sometimes we use multiple colors of genetically incorporated fluorescent molecules that are fused to key cellular structures at the genetic level combined with selective chemical stains, and these specimens can be quite challenging to make. Other techniques, such as scanning electron microscopy, require very little specimen preparation aside from simple chemical fixation followed by drying and metal coating.
One of the secrets to creating visually striking images through a microscope is in the sample preparation, which can take days or even weeks of work before any images are shot. I work extensively on imaging the brain, and this can be the most challenging and require the most advanced work. Usually I need to chemically preserve the specimen with a series of treatments and then slice it into thin sections with a special machine. I then label different components of the cell with special fluorescent stains that will light up when laser light is shined on them.
Sitting in front of a very powerful microscope, some capable of magnifying over a million times, I sometimes feel as if I am an explorer visiting an alien world for the first time. The beauty and wonder of nature does not stop with our limited eyesight, but is propagated all the way down through what we call the mesoscale; the range from just beyond our vision to near atomic scale. Even things that you would not think beautiful are still fascinating to see, from simple bacteria that appear to whimsically dance on a silicon wafer, to HIV coming out of a cell.
At NCMIR I have the opportunity to work with many leading scientists. One researcher here at UCSD, Dr. Michael Karin, is an expert in the field of cancer, inflammation and metabolic disease. Through his research he created a transgenic fruit fly that lacks a particular key protein he is studying that causes it to age prematurely, possible opening the prospect of significantly reducing age-related diseases and increasing human lifespan some day. The work was to be published in the prestigious journal Science and he wanted a stunning image of the fly for potential use on the journal cover. It was a difficult shot to set up using a scanning electron microscope, as the sample was not much larger than a millimeter in size and I wanted to give the appearance that it was alive and in flight. This required a few tricks, but I was very pleased with the end result.
{ “img”: “/wp-content/uploads/2015/07/micro_13.jpg”, “text”: “HIV particles are lying on the cell surface. Scanning electronic microscope”},
{ “img”: “/wp-content/uploads/2015/07/micro_14.jpg”, “text”: “Immortal (cancer) cells HeLa, painted blue (microtubules), red (actin) and violet (DNA). Multiphoton fluorescent microscope”},
{ “img”: “/wp-content/uploads/2015/07/micro_15.jpg”, “text”: “E.coli bacterium on the silicon wafer. Scanning electronic microscope”}

Igor Siwanowicz
I was fascinated with nature since before I can remember; my parents are biologists and I grew up surrounded by biology textbooks. I enjoyed browsing through the illustrations and photographs long before I learned how to read. I wasn’t even 26 yet when I bought my first camera and found myself on the supply side of nature photography with a special focus on macro technique. I quickly realized that microscopy would perfectly complement that activity. Six years ago – after abandoning protein biochemistry and moving to the field of neurobiology – I finally gained access to a confocal (Ed. note: high-contrast) microscope.
The confocal microscope is a rather high end piece of scientific equipment, a basic setup costs in the ballpark of $100K, so unless you are working in the field of cell or neurobiology your chances of encountering one are slim. Of course you don’t need that particular type of microscope to take spectacular images – a basic light microscope costs a few hundred bucks, and you can find adapters allowing you to connect any type of camera.
Various samples and imaging techniques require different methods of preparation. For fluorescent techniques (like confocal microscopy), in most cases, samples have to be made fluorescent by the use of dyes or conjugated antibodies specifically binding certain intra- or extracellular structures. To be able to image cellulose (the building material of the plant’s cell walls) or chitin (exoskeletons of various arthropods) I am using two substances: Congo Red and Calcofluor White. Both were first used in textile industry for their propensity for binding cellulose fibers.
The same principles hold true for photomicrography as for any kind of visual art – composition, lightning, contrast and color all contribute to the impact an image has on the viewer.
The final result is more often than not a surprise – the microscope “sees” the specimen in a very different way than we do, and the ability to pick up tiny details isn’t all of it. The microscope’s sensitivity to light of short and long wavelengths stretches beyond our limits, the result is an image that doesn’t correspond at all to what we see with our eyes – the effect is nearly impossible to predict, but almost always delightful and amazing.
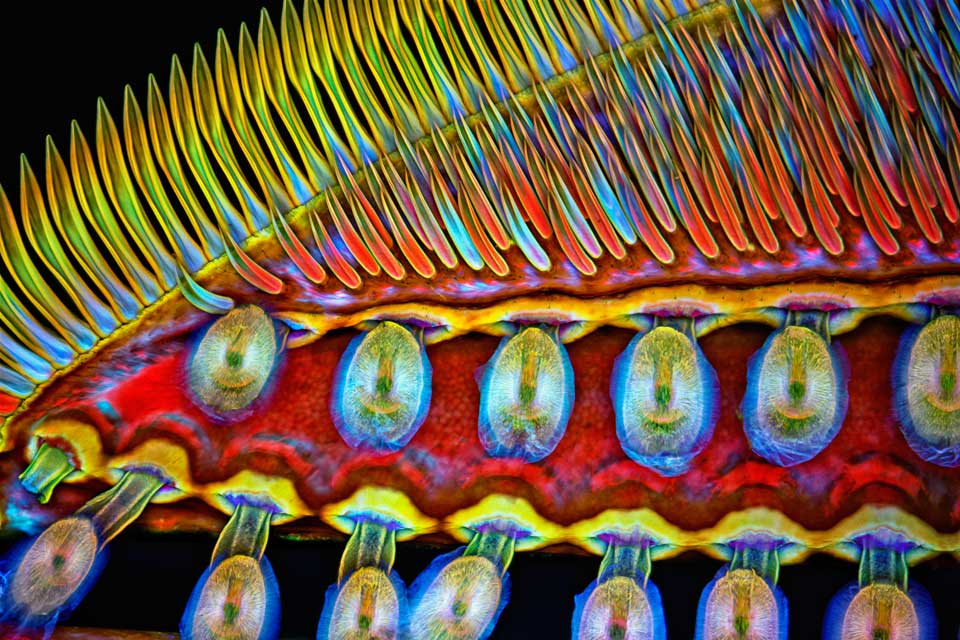
{ “img”: “/wp-content/uploads/2015/07/micro_18.jpg”, “text”: “Dragonfly eye.”},
{ “img”: “/wp-content/uploads/2015/07/micro_19.jpg”, “text”: “Rotifers around unicellular green algae.”},
{ “img”: “/wp-content/uploads/2015/07/micro_20.jpg”, “text”: “The open trap of a bladderwort, a carnivorous plant, with unicellular organisms inside.”},
{ “img”: “/wp-content/uploads/2015/07/micro_21.jpg”, “text”: “A cluster of spore cases filled with spores and defensive indumenta called paraphyses on a fern.”},
{ “img”: “/wp-content/uploads/2015/07/micro_22.jpg”, “text”: “Eye of a dragonfly Enallagma cyathigerum”}
All photos credit Igor Siwanowicz for the Olympus BioScapes Competition.

Anna Ignatova
I work with rare materials, such as stone cast materials or synthetic mineral alloys. Contrary to the assumption, it is not that difficult to melt stones: the temperature is slightly higher than required for steel. Such non-metal alloy looks like volcanic lava. The structure of such materials varies greatly, as do the minerals in the natural environment. When I started working in this direction I had no idea that the microstructure would be so interesting – before, I only worked with metals, and you can’t see anything like this with them.
My colleagues and I use optical (up to 500×) and electronic (20,000—30,000×) microscopy for work. The quality of the image depends not as much on the equipment, as on the quality of sample preparation. For instance, for optical microscopy you need to first file down the material into a thin transparent film. Then, this film is attached to the glass and studied through the eyepiece of the microscope. The saturation of the image greatly depends on the thickness of the sample – the thicker the better. When we use electronic microscopy we have to spray on carbon on the sample, otherwise we won’t be able to see anything due to the low conductivity.
You get an ideal photograph when you have both good equipment and a well-prepared sample. In optic microscopy I like to use equipment with German optics, and in electronic microscopy I like the results I get with Japanese equipment.
It will be fair to say that it also matter how professional you are with the equipment. That’s why the photo is always the result of collaboration – of those who create the sample, those who process it and those who adjust the equipment for shooting.
Photographs for me are not only part of the study, but getting acquainted with the material. It is like an intimate conversation with someone who initially couldn’t say anything. The structure shows what was done to the material, the outside appearance of the pieces tell how exactly the material degraded.
{ “img”: “/wp-content/uploads/2015/07/micro_02.jpg”, “text”: “Synthetic fluorphlogopite”},
{ “img”: “/wp-content/uploads/2015/07/micro_03.jpg”, “text”: “Synthetic fluorphlogopite”},
{ “img”: “/wp-content/uploads/2015/07/micro_04.jpg”, “text”: “Accumulation of crystals around a pore in a silicon alloy”},
{ “img”: “/wp-content/uploads/2015/07/micro_05.jpg”, “text”: “Structure of crystalline material from dolomite and gabbro”},
{ “img”: “/wp-content/uploads/2015/07/micro_06.jpg”, “text”: “Crystal in a silicon alloy”},
{ “img”: “/wp-content/uploads/2015/07/micro_07.jpg”, “text”: “Crystal in a silicon alloy”},
{ “img”: “/wp-content/uploads/2015/07/micro_08.jpg”, “text”: “Crystalline build-ups in a silicon alloy”},
{ “img”: “/wp-content/uploads/2015/07/micro_09.jpg”, “text”: “Crystal in a silicon alloy coating”},
{ “img”: “/wp-content/uploads/2015/07/micro_10.jpg”, “text”: “Crystal of epidote (mineral compound in silicon alloy)”}
New and best